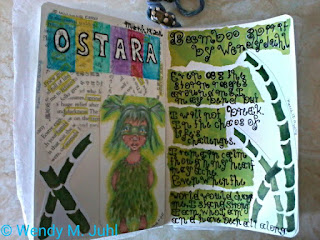
Samhain Journaling: Part Two
This art journal spread is taking longer than I expected. Today, I'll show you how to paint the skin and eyes of the focal image. In part three, I'll show you a fun way to add texture to the hair, how to add glazes to the background, and how to add interesting finishing touches to your spread.
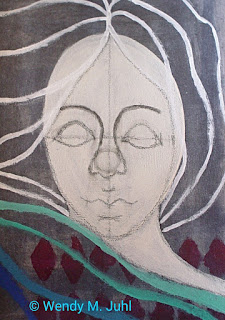
Drawing the Facial Features:
I used a black Stabilo Marks All pencil to draw the face and redefine the hairline in some areas. I wanted to make sure that the drawing would show up in the picture. Normally, I would have used my delft blue Cretacolor Aqua Monolith watercolor pencil, since it blends in well with the colors I use for shading. I would suggest using a watercolor pencil if you have it, but use whatever you have. When I draw, I don't use a lot of guidelines. I divide the face in half vertically and horizontally. Other than that, I draw the features where they look good to me. You can use my drawing as a guide to draw your own focal image if you're new to drawing. If you're struggling with a certain facial feature, I would suggest looking at photos of people online for reference. I usually have difficulty with noses. I'm constantly changing what style of nose I draw. When I watch television, I observe the shape of the characters noses. This time, I looked at pictures online until I had an idea of how to draw the nose.
Steps to Shading the Face:
***Note: I used Caran d'ache Neocolor 2s that I blended with Golden zinc white fluid acrylic paint to shade the face, but you can use another kind of paint. I'm not an expert on mixing skin tones, but some good colors to use when shading a similar skin tone to what I did would be salmon or portrait pink, pale lavender, pale periwinkle blue, russet and/or pale pink. My favorite colors to use for the shadows on the face are purple and blue. There are other colors that work well for a more realistic skin tone, such as ochre, burnt umber, certain shades of pink, titanium buff or unbleached titanium, and certain browns. According to my experience, there's a formula you can use when shading just about anything, including the face: a light color + a medium color + a dark color + white for highlights. You can create any kind of skin tone, whether real or imagined with that simple formula. I know a lot of artists who work from light to dark and then add the highlights. I work a little differently, which you'll see in the steps below.

1. I started with the medium color (see photo above), which was a periwinkle blue Neocolor 2 crayon that I blended out with zinc white acrylic paint. Zinc white is transparent, whereas titanium white is more opaque. The main areas that I put the medium tone on are under the bottom lip, under the cheeks, around the eyes, along the edges of the face, and the outside area of the neck and shoulder. If you don't have Neocolor 2s, you can use any lavender paint or marker you have. Allow the skin to dry thoroughly.

2. Next, I add in the darkest shading with a sky blue Neocolor 2 crayon blended with zinc white acrylic paint (see photo above). Use whatever light blue paint or marker you have. It may look like I used it pretty much all over, but I didn't. The main areas to focus on when adding this color are underneath the bottom lip, over most of the neck (since a shadow is thrown on the neck by the mountain), along the line of the mountains that is right against the skin, around the eyes, underneath the cheekbones, along the edges of the face, around the tip of the nose, and the upper part of the nostrils. Allow the skin to dry completely.

3. Then, I used a salmon Neocolor 2 crayon, which I blended with zinc white acrylic paint (see photo above). This is the light color I mentioned before. You can use portrait pink or a salmon color of paint or marker if you don't have Neocolor 2s. I painted all of the skin except for the lips with this color. Allow the paint to dry before going on to the next step.
4a. Finally, I painted the eyes and lips then added the blush and highlights. I used these Neocolor 2s: russet (blush/lips), pink (blush/lips), light blue (eyes), ultramarine blue (eyes), and black (eyes). If you don't have Neocolor 2s, you can use similar colors of paint or markers. Add the blush colors in small amounts to the chin, the tip of the nose and the forehead. Use a little bit more of the blush colors on the cheeks.
4b. Add the pink along the center of each lip, following the contours of the lips. Add the russet to the other areas of the lips.
4c. I color the eyes in a special way. I usually use colored pencils or a mix of colored pencils and paint. I color in the pupils where I want them to be, and that changes with each painting. I either use black for the pupils or a darker version of the color of the irises, such as indigo for blue eyes. As for the iris itself, I rim the outer edge with a medium tone. In this case, it's ultramarine blue. The rest of the iris is painted with one light color or a gradation of light colors. For this painting, I used light blue. I outline the eyes in black and add highlights in white along the lower curve of the eyeball, as well as dots here and there. You can try my way or do your own thing. I paint stylized portraits, so if you do realism, then you may want to do your own thing. That's okay too.
4d. I use titanium white acrylic paint for the highlights. Use whatever opaque white paint or marker you have. I usually put highlights just above and below the outlines on the eyes, under the eyebrows, on the tip of the nose, at the outer upper edges of the cheeks, on the outer edge of the nostrils, above the top lip, in the center of both lips, at the top of the chin, and towards the center of the neck. If you drew your focal differently than mine, you will have some highlights in different places.
This is what the art journal spread looks like so far:

I was losing light, so the photo doesn't portray the colors accurately.
Sometime tomorrow, I'll be posting part three, which will show you how to finish your page or spread. I'd love to see your progress on any of the projects inspired by the posts here on Visionary Night, so please leave a link in the comments below.
Wendy

Comments
Post a Comment